Prepare your development environment
Before writing any Solidity code, you need a working node connection and a funded wallet. Monad is an Ethereum-compatible Layer 1 blockchain, which means you can use standard Ethereum tooling like Hardhat, Foundry, and MetaMask. However, you must point these tools to the correct Monad RPC endpoint to interact with the testnet or mainnet.
Install a self-custody wallet that supports custom EVM networks. MetaMask is the standard choice for most developers. Create a new wallet if you do not have one, and securely back up your seed phrase. This wallet will hold your testnet tokens and sign transactions.

You need to manually add the Monad RPC details to your wallet. For the testnet, use the official Monad testnet RPC URL provided in the Monad documentation. Set the Chain ID to the testnet value (e.g., 10143 for the testnet, verify current ID). Use 0x prefix for hexadecimal values if required by your wallet interface. This step ensures your wallet knows where to send transactions.
You cannot deploy contracts without gas. Visit the official Monad testnet faucet to request free testnet MON tokens. Enter your wallet address and submit the request. Wait for the transaction to confirm on the faucet's explorer. This step is critical because you will need these tokens to pay for deployment transactions.
Initialize your project with Hardhat or Foundry. Add the Monad RPC URL to your hardhat.config.js or foundry.toml as a custom network. Ensure your private key or mnemonic is stored securely in environment variables. This configuration allows your scripts to sign and broadcast transactions to the Monad network.
Verify your setup by running a simple balance check using your framework. If you can retrieve your wallet's MON balance, your environment is ready for smart contract deployment.
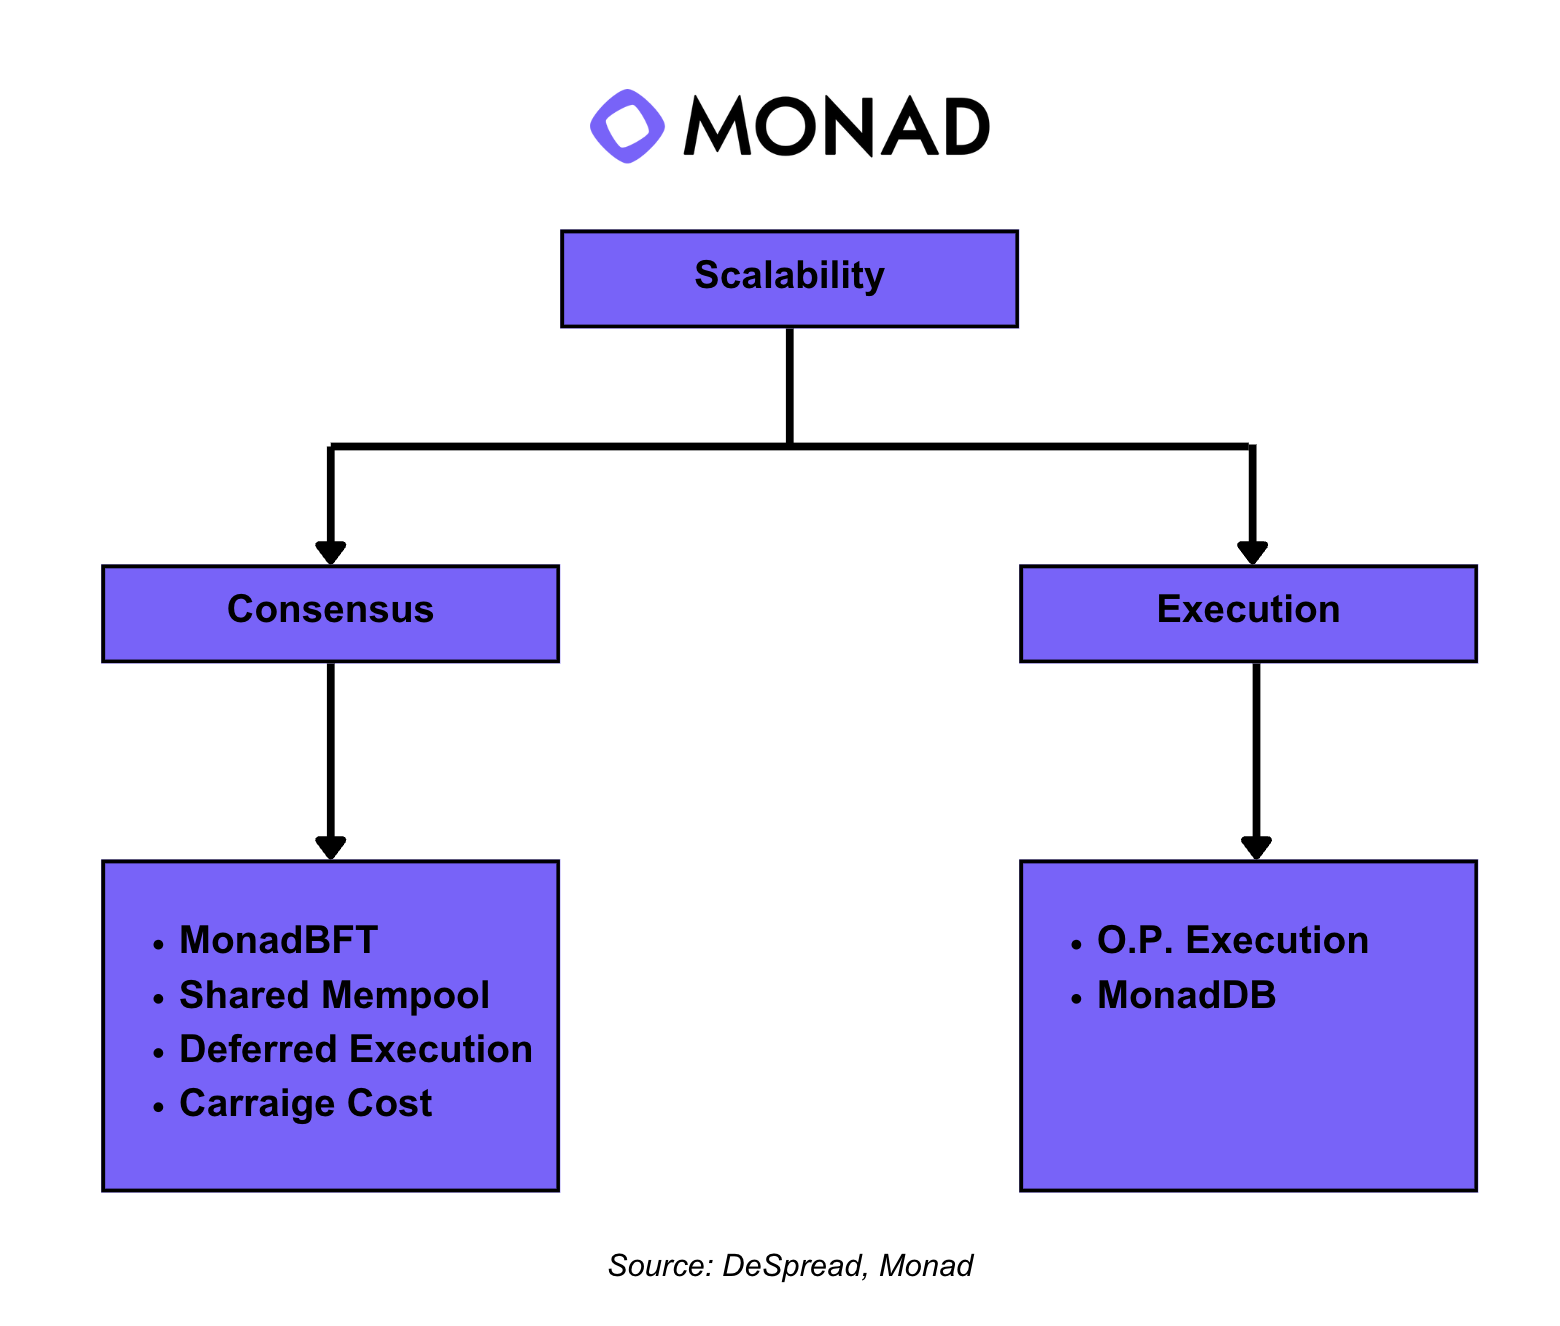
Configure Hardhat for parallel EVM execution
Configuring Hardhat for Monad requires more than just swapping RPC endpoints. Because Monad is a parallelized EVM, it processes transactions differently than sequential chains like Ethereum or standard L2s. You must adjust your network configuration to handle Monad's specific block time and gas dynamics to ensure your deployments and tests run correctly.
Start by installing the official Monad Hardhat plugin. This package provides the necessary extensions to interact with Monad's parallel execution environment.
npm install @monad-labs/hardhat-monad
Once installed, import the plugin in your hardhat.config.js file. This registers the custom network types and task handlers required for Monad-specific operations.
require('@monad-labs/hardhat-monad');
Add a new network entry to your hardhat.config.js file. Use the testnet RPC URL for development. Monad's parallel nature means block times are significantly faster than Ethereum's 12-second average, so you may need to adjust your timeout settings in your testing scripts to avoid premature failures.
module.exports = {
  networks: {
    monadTestnet: {
      url: 'https://rpc.testnet.monad.xyz',
      accounts: [process.env.PRIVATE_KEY],
      chainId: 10143, // Monad Testnet Chain ID
      gas: 'auto',
      gasPrice: 'auto'
    }
  }
};
Standard Ethereum tools assume sequential transaction ordering. When deploying to Monad, ensure your deployment scripts explicitly handle parallel execution. Use the hardhat-monad extension's helper functions to batch transactions if your contract logic depends on specific ordering within a block.
npx hardhat run scripts/deploy.js --network monadTestnet
If you encounter timeout errors during deployment, increase the gasLimit and maxFeePerGas slightly. Monad's parallel throughput can cause temporary congestion during high-activity periods, requiring higher priority fees for timely inclusion.
Monad vs. Ethereum L2 Configuration
The table below highlights the key differences in Hardhat configuration between Monad and typical Ethereum L2s like Arbitrum or Optimism.
| Feature | Monad | Standard ETH L2 |
|---|---|---|
| Execution Model | Parallel EVM | Sequential EVM |
| Block Time | ~1 second | 1-3 seconds |
| Gas Pricing | Dynamic parallel gas | Standard EIP-1559 |
| Hardhat Plugin | @monad-labs/hardhat-monad | @nomicfoundation/hardhat-toolbox |
By following these steps, you ensure your development environment is aligned with Monad's unique parallel architecture, preventing common deployment errors.
Write and compile your first contract
Start by setting up a standard Solidity file. Because Monad is fully EVM-compatible, you can use standard tools like Foundry or Hardhat without modification. The primary difference lies in how the network handles gas. Monad’s parallel execution engine processes transactions in batches rather than strictly sequentially. This means the traditional Ethereum gas optimization tricks—like minimizing storage writes to save gas—become less critical for performance, though they remain important for cost efficiency on the testnet.
Step 1: Define the contract structure
Begin with a basic ERC-20 or ERC-721 template. This ensures your code adheres to standards that Monad’s tooling expects. Keep the logic simple to isolate the deployment process. Focus on the core functions: transfer, mint, or approve. Avoid complex inheritance chains in your first test, as they can obscure debugging errors related to Monad’s specific execution environment.
Step 2: Implement Monad-specific optimizations
While standard gas limits are less of a bottleneck, you should still structure your data efficiently. Monad’s high throughput (10,000+ TPS) means your contract will be called frequently. Use memory variables over storage variables where possible to reduce the overhead of state changes. This aligns with Monad’s design for correctness under load, ensuring your contract remains responsive even during peak network activity [src-serp-6].
Step 3: Compile and verify locally
Compile your contract using forge build or npx hardhat compile. Review the bytecode output to ensure there are no warnings. Monad’s testnet validators require standard EVM bytecode, so any compilation errors here will prevent deployment. If you are using Foundry, ensure your foundry.toml is configured to target the Monad testnet chain ID if you plan to test locally before pushing to the network.
Step 4: Prepare for deployment
Before sending the transaction, ensure you have testnet MON tokens for gas fees. Although gas is cheap, it is not free on the testnet. Verify your wallet is connected to the correct Monad RPC endpoint. A mismatched network configuration is the most common cause of deployment failures for new Monad developers.
Deploy to the Monad network
Deploying your smart contract to the Monad mainnet requires a configured wallet, sufficient MON balance for gas, and a verified contract source. Monad’s parallel execution engine processes transactions with 0.8-second finality, making the deployment process significantly faster than traditional EVM chains. This speed reduces the window for transaction malleability and provides near-instant confirmation for your deployed code.
Ensure your wallet (such as MetaMask) is configured with the correct Monad RPC URL and chain ID. Switch your active network to Monad Mainnet. Verify your connection by checking the network status in your wallet interface. A successful connection is the prerequisite for any on-chain interaction.
You need MON tokens to pay for deployment gas fees. Transfer MON from an exchange or bridge to your wallet address. Check the current MON price and gas estimates to ensure you have enough balance. Monad’s high throughput means gas costs are generally low, but you must have a positive balance to initiate the transaction.
Use your development framework (Hardhat, Foundry, or Remix) to compile your smart contract. Initiate the deployment transaction to the Monad network. The transaction will be broadcast to the network. Due to Monad’s 0.8s finality, the contract will be considered deployed and immutable shortly after the transaction is confirmed.
After deployment, obtain the contract address from your transaction receipt. Navigate to the official Monad block explorer. Submit your contract’s source code, compiler version, and constructor arguments for verification. Verification allows other users to read and interact with your contract safely. Without verification, the contract will appear as unverified bytecode.
Once the contract is verified, you can interact with it using the block explorer’s interface. The verification process ensures transparency and allows other developers to audit your code. This step is critical for building trust in decentralized applications. Monad’s infrastructure supports this workflow efficiently, allowing developers to focus on logic rather than network bottlenecks.
Common Monad deployment mistakes
Deploying on Monad requires adjusting for its parallel execution model. Standard Ethereum tooling often misinterprets Monad’s high-throughput architecture, leading to failed transactions or silent data corruption. Treat the mainnet deployment as a precision operation, not a copy-paste job.
Incorrect gas estimation
Monad’s parallel processing allows for higher throughput but changes gas dynamics. Using static gas limits from older Ethereum templates often results in transactions reverting because the limit is too low for complex parallel state updates. Always use dynamic gas estimation tools that account for Monad’s specific block space constraints.
Wallet connection timeouts
High transaction frequency can trigger aggressive timeout thresholds in standard wallet providers. If your deployment script sends multiple parallel requests, your wallet may disconnect before the transaction is signed. Increase your connection timeout settings and implement retry logic for failed connection attempts.
Ignoring Monad-specific RPC endpoints
Using generic Ethereum RPC endpoints often leads to rate-limiting errors or stale data. Monad requires specific RPC endpoints that support its parallel execution state root. Verify your provider supports Monad’s unique state verification before deploying.
No comments yet. Be the first to share your thoughts!